Applying Digital Signature to Your PDF

There is a difference between digital signatures and electronic signatures. The latter encompasses digital signatures but also includes the ability to simply print their handwritten signatures onto documents. Whereas, digital signatures involve the use of cryptographic algorithms to provide the most robust and secure electronic signatures.
A document which is digitally signed is legally valid in many countries. This depends on the type of signatures being used. You can use digital signatures to comply with most demanding legal and regulatory requirements as they make it easy to track each of the signer’s identity and the authenticity of the documents. UniPDF now allows you to conveniently digitally sign PDF documents using our Golang based library.
The following are some of the main benefits of digital signatures:
- You can verify the originality of the document and ensure nothing has been changed.
- You can easily keep track of any changes through their associated digital signatures.
- The feature of tracking changes can be used to verify if the document is provided by an authentic institution.
UniPDF is one of its kind implementation in Golang and supports digital signature since the release of UniPDF v3. The library supports multi-signatures in PDF documents using its incremental writing approach. This enables UniPDF to sign a document multiple times without invalidating its hash. How this works is that when a new signature is applied on the document, the original version is left intact and only the changes from the previous revisions are added.
The multi-signature feature of UniPDF allows it to support multi-party signatures, which means that different entities can digitally sign a document to authenticate it. This is useful when a document has to be verified from multiple offices or authorities, like in governments.
What You Can Do With UniPDF
You can test out UniPDF’s library by implementing the code samples available on the examples GitHub repository. Code samples for the following scenarios exist in the linked repo:
➔ Signing documents using RSA key pair (link)
The example demonstrates the signing and validation of documents with a keypair created using RSA algorithm. It works by creating the hash of the message (document) and attaching it with the document. The end-user re-hashes the document and compares it with the original hash to check its authenticity.
➔ Signing documents using PKCS#12 file (link)
The PKCS#12 file contains both the private key and the X.509 certificate that is used for signing the document. When you create a new digital signature using Acrobat or other services, they provide a PKCS#12 file, which has a .pfx extension in Windows and a .p12 on MacOS. The sample code teaches you how to use a PKCS#12 file to digitally sign documents using UniPDF.
➔ Signing documents using an external signature generator service and appending the signature into a blank signature field (link)
You can use this example when you are already using an external service for signing PDFs but want to use UniPDF’s awesome library for formatting and inserting signatures. If the external service returns a PCKS#7 package, then you can easily append the signatures using this example code. This works by signing the PDF with a “blank” signature and passing it to the third-party API that creates the signature. The newly created signature replaces the blank signature to provide a fully valid signed file.
➔ Signing documents using PKCS#11 service using SoftHSM and Crypto11 package (link)
You can use USBs or other hardware devices that can store a PKCS#11 certificate to sign PDF documents. The linked example script teaches you how to use UniPDF to sign your documents in such a scenario. This is often necessary when signing from a certificate trusted by the Adobe Approved Trust List (AATL).
➔ Validating digital signatures in PDFs (link)
The next step after digitally signing a PDF document or after receiving a document that has been digitally signed is to validate them. Along with digitally signing documents, UniPDF also allows you to validate digitally signed documents. The linked code sample teaches you exactly how you can perform this task using UniPDF v3.
How to Insert a Digital Signature using UniPDF
Let’s take a look at how we can digitally sign and create its visual annotation using UniPDF. The example script will require you to input a sample PDF that will be digitally signed. You can either create a PDF using UniPDF or use any of your existing PDF documents. For this tutorial, we are using a sample contract that we downloaded from the internet.
If you simply want to run the default example, without getting into the details, then simply download the pdf_sign_appearance.go file from the GitHub example repo and run it using the following command:
go run pdf_sign_appearance.go <input_pdf.pdf> <output_pdf.pdf>
Code Breakdown
We are going to breakdown the code into chunks so that it is easier to understand. The first few lines mention the key packages that need to be imported to make it work. The key packages are:
import (
        "crypto/rand"
        "crypto/rsa"
        "crypto/x509"
        "crypto/x509/pkix"
        "fmt"
        "log"
        "math/big"
        "os"
        "time"

        "github.com/unidoc/unipdf/v3/annotator"
        "github.com/unidoc/unipdf/v3/core"
        "github.com/unidoc/unipdf/v3/model"
        "github.com/unidoc/unipdf/v3/model/sighandler"
)
The core and model packages provide fundamental PDF types and document models. The packages also contain the reader and writer methods. You can read more about the model and core packages in the UniPDF v2 press release.
The annotator package provides methods to create custom-looking signature fields. Lastly, the sighandler package is the key package that contains the actual algorithms.
Generating Keys
The first step towards digitally signing a PDF document is the creation of private/public key pairs. Key pairs can be created using UniPDF’s generateKey() function that returns a private key and a X.509 certificate. This step is being performed in the code block below.
// Generate key pair.
priv, cert, err := generateKeys()
if err != nil {
    log.Fatal("Fail: %v\n", err)
}
However, in most cases, users have their own key pairs, generated from third-party applications or provided by a higher authority. These keys are held in USB devices or HSM devices and can also be used with UniPDF.
Here is what the generateKeys() function is actually doing:
func generateKeys() (*rsa.PrivateKey, *x509.Certificate, error) {
    // Generate pri_vate key.
    priv, err := rsa.GenerateKey(rand.Reader, 2048)
    if err != nil {
        return nil, nil, err
    }

    // Initialize X509 certificate template.
    template := x509.Certificate{
        SerialNumber: big.NewInt(1),
        Subject: pkix.Name{
            Organization: []string{"Test Company"},
        },

        NotBefore: now.Add(-time.Hour),
        NotAfter:  now.Add(time.Hour * 24 * 365),

        KeyUsage:              x509.KeyUsageDigitalSignature,
        ExtKeyUsage:           []x509.ExtKeyUsage{x509.ExtKeyUsageServerAuth},
        BasicConstraintsValid: true,
    }

    // Generate X509 certificate.
    certData, err := x509.CreateCertificate(rand.Reader, &template, &template, priv.Public(), priv)
    if err != nil {
        return nil, nil, err
    }

    cert, err := x509.ParseCertificate(certData)
    if err != nil {
        return nil, nil, err
    }

    return priv, cert, nil

}
Creating Reader and Signature
After we’ve generated the keys, a reader reads the inserted PDF, an appender is created for appending the signature. A signature handler is created that is based on the private key and certificate we created earlier. Lastly, we create a digital signature that is based on the signature handler and initialize it. These steps have been defined in the code block below.
// Create reader.
file, err := os.Open(inputPath)
if err != nil {
    log.Fatal("Fail: %v\n", err)
}

defer file.Close()
reader, err := model.NewPdfReader(file)
if err != nil {
    log.Fatal("Fail: %v\n", err)
}

// Create appender.
appender, err := model.NewPdfAppender(reader)
if err != nil {
    log.Fatal("Fail: %v\n", err)
}

// Create signature handler.
handler, err := sighandler.NewAdobePKCS7Detached(priv, cert)
if err != nil {
    log.Fatal("Fail: %v\n", err)
}

// Create signature.
signature := model.NewPdfSignature(handler)
signature.SetName("Test Signature Appearance Name")
signature.SetReason("TestSignatureAppearance Reason")
signature.SetDate(time.Now(), "")
if err := signature.Initialize(); err != nil {
    log.Fatal("Fail: %v\n", err)
}
In the next step, we get the number of pages of the inserted PDF. This is found out by the reader’s inbuilt function GetNumPages(), here’s the code for it:
numPages, err := reader.GetNumPages()
if err != nil {
log.Fatal("Fail: %v\n", err)
}
Inserting the Signature
Now we have everything that is needed for digitally signing the PDF document and place its visual annotation in the document. In the proceeding code block, we are inserting the visual annotation on each page of the inserted PDF document.
// Create signature fields and add them on each page of the PDF file.
for i := 0; i < numPages; i++ {
    pageNum := i + 1

    // Annotation 3.
    opts := annotator.NewSignatureFieldOpts()
    opts.BorderSize = 1
    opts.FontSize = 10
    opts.Rect = []float64{475, 25, 590, 80}
    opts.FillColor = model.NewPdfColorDeviceRGB(255, 255, 0)
    opts.TextColor = model.NewPdfColorDeviceRGB(0, 0, 200)
    sigField, err := annotator.NewSignatureField(
    signature,
    []*annotator.SignatureLine{
    annotator.NewSignatureLine("Name", "John Smith"),
    annotator.NewSignatureLine("Date", "2019.02.19"),
    annotator.NewSignatureLine("Reason", "Another reason"),
    annotator.NewSignatureLine("Location", "Paris"),
    annotator.NewSignatureLine("DN", "authority3:name3"),
},
opts,
)

    sigField.T = core.MakeString(fmt.Sprintf("Signature3 %d", pageNum))
    if err = appender.Sign(pageNum, sigField); err != nil {
        log.Fatal("Fail: %v\n", err)
    }

}

// Write output PDF file.
err = appender.WriteToFile(outputPath)
if err != nil {
    log.Fatal("Fail: %v\n", err)
}

log.Printf("PDF file successfully signed. Output path: %s\n", outputPath)
The for loop goes through each page of the inserted PDF and creates a signature field that comprises of name, date and other bits of information, which are appended to the page. The output is written to a new PDF given by the outputPath.
After the loops run successfully, a message is printed indicating that a new PDF file has been digitally signed and created at the outputPath. The annotator.NewSignatureLine() method accepts a string and allows for the creation of a customized signature annotation, which can be used for keeping a track of documents via the signatures.
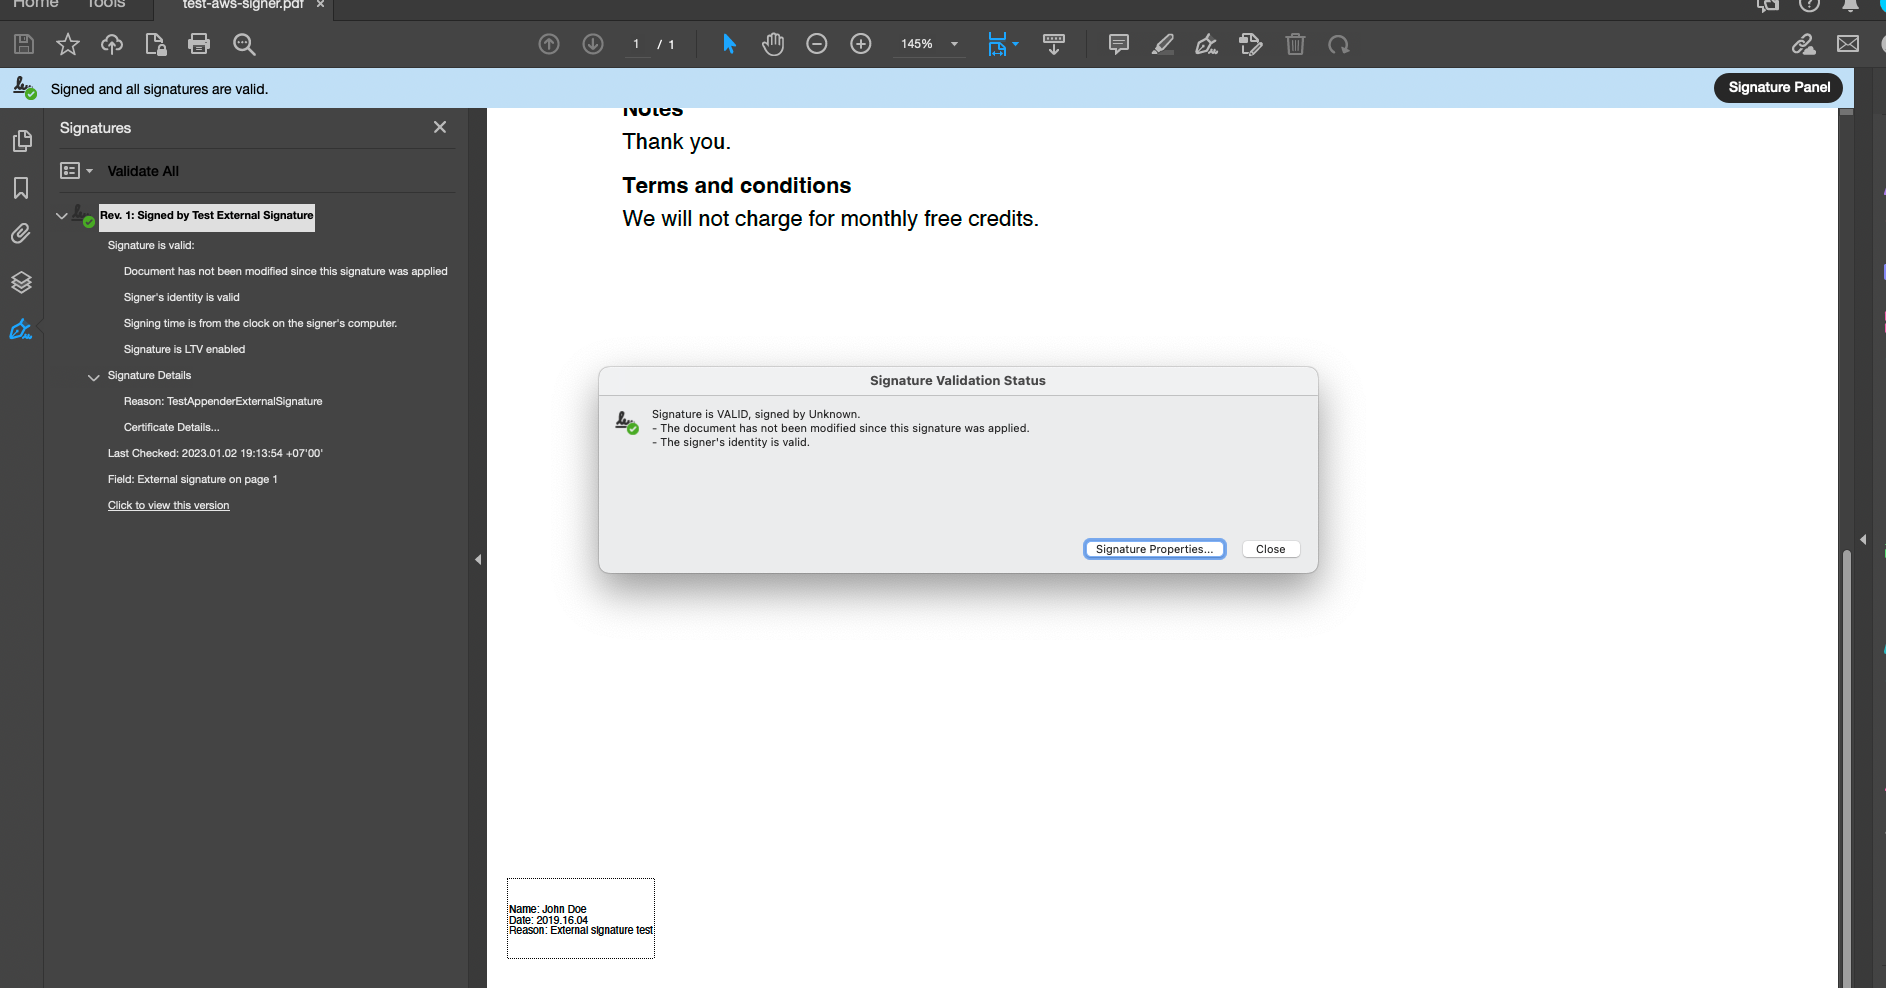
Example Document
We downloaded a sample contract from the internet and used the above-given code to digitally sign it. The following image shows the signed contract, with visual annotations printed at the bottom right of the page. Everything about the annotation can be customized, from its position, background colour to text size and font style.

Conclusion
Alongside digitally signing documents, UniPDF contains a number of other tools as well. You can generate invoices based on templates, extract text from PDF and perform a number of other tasks. Check out the functionalities offered by UniPDF by visiting our GitHub repository. It contains a number of free code samples that can help you get started with UniPDF.
We are also working on adding support for validating and creating PAdES signatures. Documents digitally signed using PAdES signature can be use in courts all over the European Union. PAdES is compliant with the European eIDAS regulation and a digital signature compliant with eIDAS has the same legal value as a handwritten signature.
If you have any questions regarding digital signatures or are facing any issues, feel free to open an issue on the examples GitHub repository.