Creating PDF reports in Golang

Creating high quality PDF reports can be a challenge for an organization. A company has to create reports for budget, daily activities and project descriptions amongst many more. Creating these reports can be a time consuming process and the majority of them follow a specific template with minimal changes.
For such large-scale repetitive PDF reports that usually follow a template, it is wise to use a software library. UniPDF is one such GoLang based library that offers a diverse set of functionalities that can simplify the task of report generation.
Using the library, you can automate the redundant process of manually creating each PDF. It offers support for adding in images, tables, headers, footers and a lot more. The PDF report generation process is simplified and quickened with the help of the said tools and allows for creating beautifully designed PDF documents.
UniPDF makes it easier for you to place images in the PDF document, without having to worry about coordinates. This removes the burden from the user to calculate the right coordinates to place the image. In UniPDF, you simply input the path to the image, select its size and simply add it where you want to.
Support For Dynamic Content
The most important art of any PDF generation library is its ability to support dynamic content. Let’s say that you have to create PDF invoice or some other report, where each report has some sort of personalized information. Normally, you would have an employee manually create each PDF with personal information of each recipient.
Using UniPDF, you can do this much faster. If the recipient information is stored in a database, then you can have a script extract the data from the database and pass it to the UniPDF library.
This way, you can create hundreds of invoices or reports in a matter of seconds by simply writing a few lines of code. Similarly, you can create a GoLang script that can take data from a .csv file or any other source and create personalized PDF reports.
Generating a PDF Report Using UniPDF
UniPDF has numerous example scripts listed on the GitHub repository that you can use to get started with the library. For this article, we will be discussing the PDF report example in the unipdf-examples repository: pdf_report.go.
The example discusses the use of UniPDF’s creator package to create PDF reports. The creator package was introduced in the v.2 of UniPDF and has been briefly described in the v.2 public release. The package allows you to efficiently work with PDF documents and supports the functionality of adding text, images and other content.
Back to the example, if you’d like to run the default example and check the performance of the UniPDF library, go ahead and clone the unipdf-examples repository.
Inside the report folder: You can run the reporting example with command:
go run pdf_report.go
Code Breakdown
If you want to understand the code and learn how you can customize it, then read ahead. We’ll be explaining how you can include text, images and create tables in your PDF report. By the end of this guide, you should be able to create a basic PDF report using UniPDF. You can also find the full example here.
The first few lines of the code mention the packages that have to be included to run the code. The packages required to run the reporting example are:
import (
    "bytes"
    "fmt"
    "image"
    "math"
    "time"

    "github.com/wcharczuk/go-chart"

    "github.com/boombuler/barcode"
    "github.com/boombuler/barcode/qr"

    "github.com/unidoc/unipdf/v3/common"
    "github.com/unidoc/unipdf/v3/creator"
    "github.com/unidoc/unipdf/v3/model"
)
The creator and model are the main UniPDF packages and were originally released in the v.2 of UniDoc and further improved after the release of v.3.
The creator model makes it easy for you to edit the PDF documents and includes the functions needed for the manipulation of PDFs. The purpose of the creator package is to create beautifully formatted reports.
The model package builds on the core package of UniPDF and contains important functions that deals with the read and write of PDF documents.
As the names explain, the go-chart, barcode and qr packages enable the inclusion of the respective elements in the reports. The math and time packages let you perform mathematical calculations and the time measurement respectively. The fmt package is a native GoLang package that deals with I/O processes. Similarly, the remaining packages help by including some useful functionality.
How to Add Paragraphs
Let’s start with the basics. Let’s try to add some text on a new page of your PDF document. The first step would be the creation of your main() function.
Main Function
func main() {
    err := RunPdfReport("unidoc-report.pdf")
    if err != nil {
        panic(err)
    }
}
The main function simply calls the RunPdfReport(“report_name.pdf”) function. It checks that if the function fails to complete its execution then it will report an error.
RunPdfReport Function
This is where all the action takes place. This is a customized function that takes care of our requirements. It accepts an output path as an argument.
func RunPdfReport(outputPath string) error {
    robotoFontRegular, err := model.NewPdfFontFromTTFFile("./Roboto-Regular.ttf")
    if err != nil {
        return err
    }

    robotoFontPro, err := model.NewPdfFontFromTTFFile("./Roboto-Bold.ttf")
    if err != nil {
        return err
    }
The first few lines of the function open the font files of your choice, the ones listed here are available in the example repo. You can change them to any other font and you simply have to replace the name of the font file in the argument of the NewPdfFontFromTTFFile(“font_file.tff”) function.
Adding Paragraphs
To create the content, the first step is to initialize a creator object. This object has the functions to create new pages, add text, images and a whole lot more.
    c := creator.New()
    c.SetPageMargins(50, 50, 100, 70)
Creating a creator is as simple as shown above, we also define the margins of the page by using its native SetPageMargins(x,y,z,k) function.
    c.NewPage()

    ch := c.NewChapter("Feature Overview")

    chapterFont := robotoFontPro
    chapterFontColor := creator.ColorRGBFrom8bit(72, 86, 95)
    chapterRedColor := creator.ColorRGBFrom8bit(255, 0, 0)
    chapterFontSize := 18.0

    normalFont := robotoFontRegular
    normalFontColor := creator.ColorRGBFrom8bit(72, 86, 95)
    normalFontColorGreen := creator.ColorRGBFrom8bit(4, 79, 3)
    normalFontSize := 10.0

    ch.GetHeading().SetFont(chapterFont)
    ch.GetHeading().SetFontSize(chapterFontSize)
    ch.GetHeading().SetColor(chapterFontColor)

    p := c.NewParagraph("This chapter demonstrates a few of the features of UniDoc that can be used for report generation.")
    p.SetFont(normalFont)
    p.SetFontSize(normalFontSize)
    p.SetColor(normalFontColor)
    p.SetMargins(0, 0, 5, 0)
    ch.Add(p)

    // Paragraphs.
    sc := ch.NewSubchapter("Paragraphs")
    sc.GetHeading().SetMargins(0, 0, 20, 0)
    sc.GetHeading().SetFont(chapterFont)
    sc.GetHeading().SetFontSize(chapterFontSize)
    sc.GetHeading().SetColor(chapterRedColor)

    p = c.NewParagraph("Paragraphs are used to represent text, as little as a single character, a word or " +
        "multiple words forming multiple sentences. UniDoc handles automatically wrapping those across lines and pages, making " +
        "it relatively easy to work with. They can also be left, center, right aligned or justified as illustrated below:")
    p.SetFont(normalFont)
    p.SetFontSize(normalFontSize)
    p.SetColor(normalFontColorGreen)
    p.SetMargins(0, 0, 5, 0)
    p.SetLineHeight(2)
    sc.Add(p)
To start adding text, we first create a new page by using the creator. It’s worth mentioning here that you can create structured reports using UniPDF since it allows you to create hierarchical chapters and subchapters.
In the code above, we are creating a Feature Overview chapter, and defining its property such as font style, colour (RBG) and size of the heading and the paragraphs inside. These properties are assigned to the heading by using the GetHeading().SetFont() function.
The paragraphs are generated using the creator and are assigned to the chapter by ch.Add(p).
To create a subchapter, we use its parent chapter’s NewSubchapter(“name”) function. This creates a hierarchical link between the chapters and subchapters. After that, similar to the chapter, we set its font and styles.
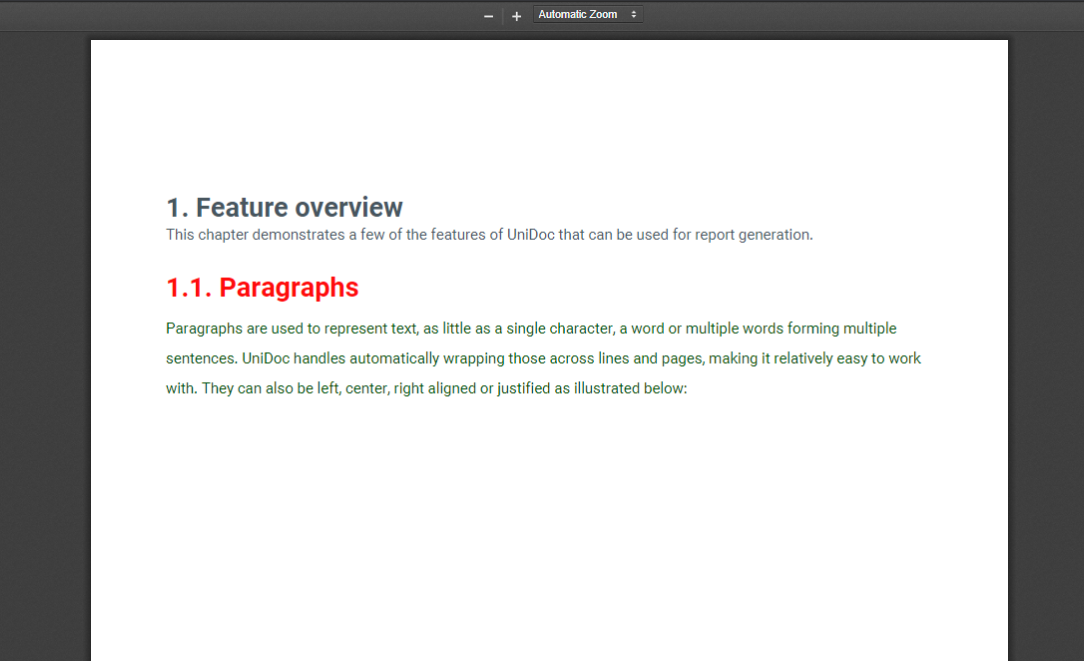
Fig 1: Creating Chapters and Adding Paragraphs
Formatted text via StyledParagraphs
A great feature of UniPDF is StyledParagraph, which allows you to change the style of different chunks of the same paragraph. Its implementation has been shown below.
    // Styled paragraphs.
    stChap := sc.NewSubchapter("Styled Paragraphs")
    sc.GetHeading().SetMargins(0, 0, 20, 0)
    sc.GetHeading().SetFont(chapterFont)
    sc.GetHeading().SetFontSize(chapterFontSize)
    sc.GetHeading().SetColor(chapterRedColor)

    stylPar := c.NewStyledParagraph()
    stylPar.SetLineHeight(3)

    boldStyle := c.NewTextStyle()
    boldStyle.Font = robotoFontPro
    boldStyle.Color = creator.ColorGreen
    chunk := stylPar.Append("This text is bolded and is in green color. We're showing how styled paragraphs work.")
    chunk.Style = boldStyle

    normStyle := c.NewTextStyle()
    normStyle.Font = robotoFontRegular
    normStyle.Color = creator.ColorBlue
    chunktwo := stylPar.Append("You can change the size, color and almost anything of the font using the StyledParagraph command. This font is in blue color and is not bold.")
    chunktwo.Style = normStyle

    hugeStyle := c.NewTextStyle()
    hugeStyle.Font = robotoFontRegular
    hugeStyle.FontSize = 25
    chunkthree := stylPar.Append("This is HUGE and black.")
    chunkthree.Style = hugeStyle

    stChap.Add(stylPar)
We’re creating a new subchapter titled Styled Paragraphs, which contains a styled paragraph, which is further decomposed to uniquely styled chunks. The first chunk has a bold font and is of colour green.
Similarly, we create two more styled chunks, one is of normal font but of the colour blue. The final chunk has the colour black and a huge font size. You can edit the code to create customized paragraphs containing different styles.
The code generates the output shown in figure 2.
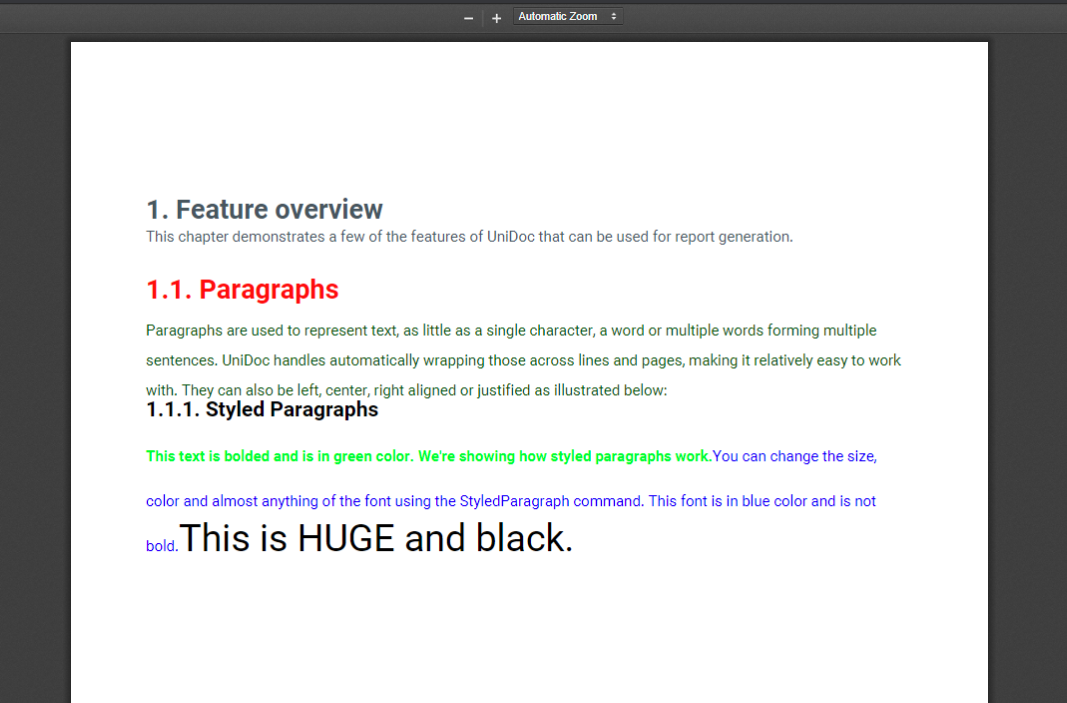
Fig 2: Adding Styled Paragraphs
Adding Tables
Now let’s move on to tables, we’re going to extend the code we used above to also generate tables in a subchapter.
    // TABLES CHAPTER.
    subChap := sc.NewSubchapter("Tables")
    subChap.GetHeading().SetMargins(0, 0, 20, 0)
    subChap.GetHeading().SetFont(chapterFont)
    subChap.GetHeading().SetFontSize(chapterFontSize)
    subChap.GetHeading().SetColor(chapterFontColor)

    ptwo := c.NewParagraph("We can also create tables using UniPDF library. Its pretty simple, read the guide to learn how we created the tables shown  below.")
    ptwo.SetFont(normalFont)
    ptwo.SetFontSize(normalFontSize)
    ptwo.SetColor(normalFontColor)
    ptwo.SetMargins(0, 0, 5, 0)
    ptwo.SetLineHeight(2)
    subChap.Add(ptwo)

    // Tables
    issuerTable := c.NewTable(2)
    issuerTable.SetMargins(0, 0, 30, 0)
    pColor := creator.ColorRGBFrom8bit(72, 86, 95)
    bgColor := creator.ColorRGBFrom8bit(56, 68, 67)
We create a subchapter, Tables and give it an opening paragraph. A table is added under this chapter.
You can initialize a table by using the creator and pass the number of columns in the arguments. In this code, we’ve set the number of columns to 2. We’ve also defined the colours of the header and contents to make it easy to distinguish between the two.
    // Creating First ROW:
    p = c.NewParagraph("Issuer")
    p.SetFont(robotoFontPro)
    p.SetFontSize(10)
    p.SetColor(creator.ColorWhite)
    cell := issuerTable.NewCell()
    cell.SetBorder(creator.CellBorderSideAll, creator.CellBorderStyleSingle, 1)
    cell.SetBackgroundColor(bgColor)
    cell.SetContent(p)

    p = c.NewParagraph("UniDoc")
    p.SetFont(robotoFontRegular)
    p.SetFontSize(10)
    p.SetColor(pColor)
    cell = issuerTable.NewCell()
    cell.SetBorder(creator.CellBorderSideAll, creator.CellBorderStyleSingle, 1)
    cell.SetContent(p)
After the table has been initialized, we move forward to create the rows and in the code shown above, we’re adding two rows. We’re setting the background colours, borders and the colour of the font of the cells. Everything is customizable and you can change it to meet your needs.
Figure 3 shows the table created using the code above, it contains more rows than the ones mentioned in the code above.
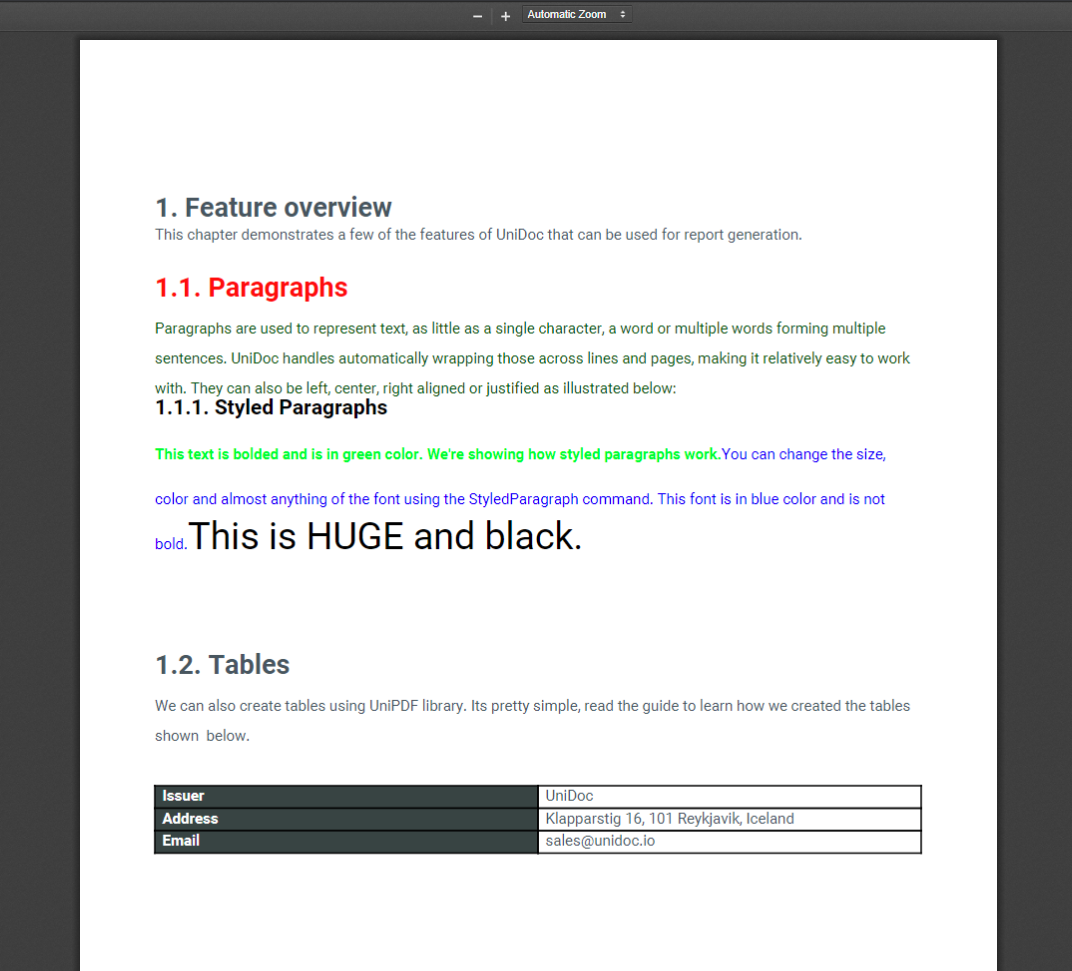
Fig 3: Creating Tables and Adding Rows
Adding Images
Images can be added in the PDF reports by using UniPDF’s creator package, which contains an inbuilt image reader. It supports all major formats of images, in this example, we are adding a PNG file.
    // Adding Images.
    subChap = ch.NewSubchapter("Images")
    subChap.GetHeading().SetMargins(0, 0, 20, 0)
    subChap.GetHeading().SetFont(chapterFont)
    subChap.GetHeading().SetFontSize(chapterFontSize)
    subChap.GetHeading().SetColor(chapterFontColor)
    ptwo = c.NewParagraph("UniPDF also provides you with the power to add images in your PDF documents. This is a very simple process and you can position images quite accurately. This enables you to create aesthetically beautiful reports. The library supports multiple image formats, here's an example with a PNG image.")
    ptwo.SetFont(normalFont)
    ptwo.SetFontSize(normalFontSize)
    ptwo.SetColor(normalFontColor)
    ptwo.SetMargins(0, 0, 5, 0)
    ptwo.SetLineHeight(2)
    subChap.Add(ptwo)

    // Show logo.
    img, err := c.NewImageFromFile("./unidoc-logo.png")
    if err != nil {
        panic(err)
    }
    img.ScaleToHeight(50)

    subChap.Add(img)
In this code, we’re creating a new subchapter for images and giving it an opening paragraph. The image is read by using the creator’s NewImageFromFile(“path_to_img”) function and added to the chapter.
The code generates the following output:

Fig 4: Adding Images
Adding Headers and Footers
To add a logo image in the header of your PDF report, we can call the creator’s DrawHeader() function.
    // Show logo.
    logoimg, err := c.NewImageFromFile("./unidoc-logo.png")
    if err != nil {
        panic(err)
    }

    c.DrawHeader(func(block *creator.Block, args creator.HeaderFunctionArgs) {
        // Draw the header on a block.
         logoimg.ScaleToHeight(25)
         logoimg.SetPos(58, 20)
         block.Draw(logoimg)
    })
The code is short and precise. You call the draw header function and in its arguments, you pass a block, which is equal the size of the page’s top margins.
We used the same logo we used earlier and set its size and position within the block before drawing it. The position we set in this context is relative to the position of the block.
The output can be viewed in the figure below
Fig 5: Adding Logo in Header
Similarly, we can create a footer by using the DrawFooter() function of the creator. The code for it is as follows:
    // Draw footer on each page.
    c.DrawFooter(func(block *creator.Block, args creator.FooterFunctionArgs) {
        // Draw the on a block for each page.
        p := c.NewParagraph("This is a footer")
        p.SetFont(robotoFontRegular)

        p.SetFontSize(8)
        p.SetPos(50, 20)
        p.SetColor(creator.ColorRGBFrom8bit(63, 68, 76))
        block.Draw(p)

        strPage := fmt.Sprintf("Page %d of %d", args.PageNum, args.TotalPages)
        p = c.NewParagraph(strPage)
        p.SetFont(robotoFontRegular)
        p.SetFontSize(8)
        p.SetPos(300, 20)
        p.SetColor(creator.ColorRGBFrom8bit(63, 68, 76))
        block.Draw(p)
    })
We’re creating a footer with a text on the left side and the page number in the center bottom. You can get the page number and the total number of pages by using the arguments passed in the function.
The positions of the paragraphs can easily be adjusted by changing the parameters of the SetPos(x,y) function.
The output of this code is as follows:
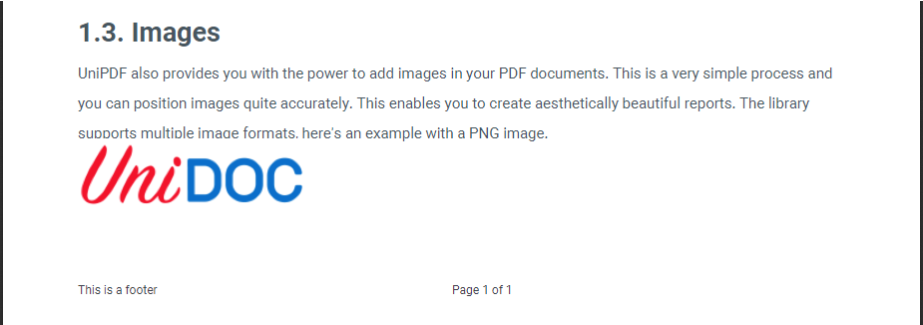
Fig 6: Adding Text in Footer
Adding Table of Contents
To add a table of contents, you simply need to define the style of the heading and the contents while initializing a new TOC() object. The code is as follows:
    // Generate the table of contents.
    c.AddTOC = true
    toc := c.TOC()
    hstyle := c.NewTextStyle()
    hstyle.Color = creator.ColorRGBFromArithmetic(0.2, 0.2, 0.2)
    hstyle.FontSize = 28
    toc.SetHeading("Table of Contents", hstyle)
    lstyle := c.NewTextStyle()
    lstyle.FontSize = 14
    toc.SetLineStyle(lstyle)

    c.draw(ch)

    err = c.WriteToFile(outputPath)
    if err != nil {
	    return err
    }
We set the boolean AddTOC to true, which tells the creator that there is going to be a table of contents for this report. After which, we initialize the inbuilt TOC() object and define the style of the heading and the lines.
UniPDF automatically creates an anchored table of content consisting of the chapters and subchapters that you create. The last few lines simply draw the main chapter and then write the whole output to the output path.
The output of the code written above is shown in figure 7.
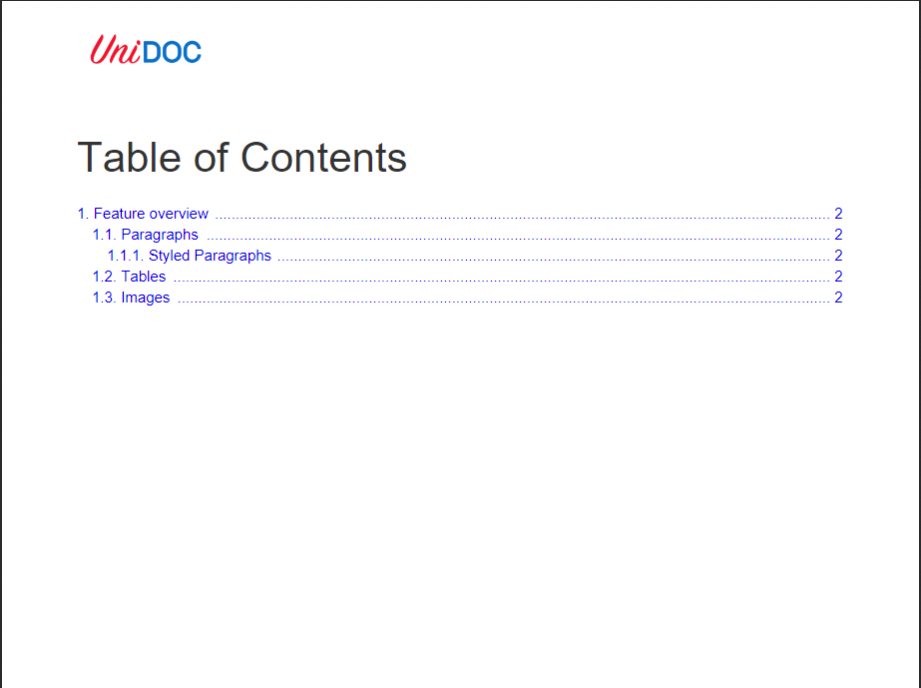
Fig 7: Creating Table of Content
Conclusion
UniPDF is a highly customizable library written in GoLang, which makes it incredibly fast. Here, we learned how to create a PDF using UniPDF, which also supports compressing, securing and extracting text and images from PDFs.
Check out the examples in the UniPDF repository. They will help you get started on using the UniPDF library. If you feel that more examples are required, open a new issue on the repo and we will try to fulfill your requirements. If you run into any other issues, open an issue on the main unipdf repository or reach out to us.